How to Prepare a Subfloor for New Flooring: A Step-by-Step Guide for Colorado Homes
October 27, 2026
Installing new flooring begins long before the first plank or piece of carpet goes down.
The finished floor may look beautiful, but its performance depends heavily on the surface underneath. An uneven, damp, unstable or poorly prepared subfloor can cause problems that careful installation alone cannot correct.
Click-lock flooring may separate or develop damaged joints. Glue-down vinyl can reveal imperfections through its surface. Adhesives may fail when moisture or contamination interferes with bonding.
Carpet is different. In many homes, carpet and padding can conceal minor subfloor imperfections that would require substantial correction before installing hard-surface flooring.
Preparing a subfloor isn't simply a matter of sweeping the room and filling a few cracks. The right approach depends on the substrate, its condition, the flooring being installed and the manufacturer's requirements.
In Colorado, there's another consideration: expansive soils that can cause concrete slabs to move, crack or heave.
And even when a subfloor is flat, its height relative to adjoining rooms may create installation challenges.
This guide explains how to evaluate and prepare concrete, plywood and OSB subfloors, what equipment the work may require, and how to determine whether the surface is ready for new flooring.
1. Remove the Existing Flooring and Inspect What's Underneath
Before beginning, determine what type of subfloor you're working with.
Most residential flooring is installed over one of three materials:
- Concrete: Common in basements, ground-level slabs and some multifamily buildings.
- Plywood: Common over wood-framed floor systems.
- Oriented strand board (OSB): Another common structural panel used in residential construction.
Some homes also have existing tile, old adhesive, patching compounds, underlayment panels or multiple layers of previous flooring.
These layers can complicate preparation.
Removing Existing Flooring
Depending on the material, removal may involve pulling carpet and padding, removing tack strips and staples, lifting floating floors, scraping adhesive or breaking out tile.
Once the surface is exposed, inspect it carefully.
Look for:
- Cracks, raised edges and uneven joints
- Water staining or dampness
- Loose or damaged panels
- Soft or deteriorated areas
- Old adhesive and patching compounds
- Protruding fasteners
- Gaps and movement
- Evidence of previous repairs
Don't assume an old floor was installed over an acceptable surface. Existing flooring may conceal problems that become apparent only after removal.
A Caution About Older Flooring and Adhesives
Some older flooring materials and adhesives may contain asbestos. Certain older coatings can also contain lead.
Disturbing these materials through sanding, grinding or demolition can release hazardous dust.
If the age or composition of an existing material is uncertain, identify it before disturbing it. Suspect materials may require appropriate testing and specialized handling.
2. Determine Whether the Subfloor Is Structurally Sound
A subfloor must do more than provide a smooth surface. It must adequately support the flooring installed above it.
Concrete Subfloors
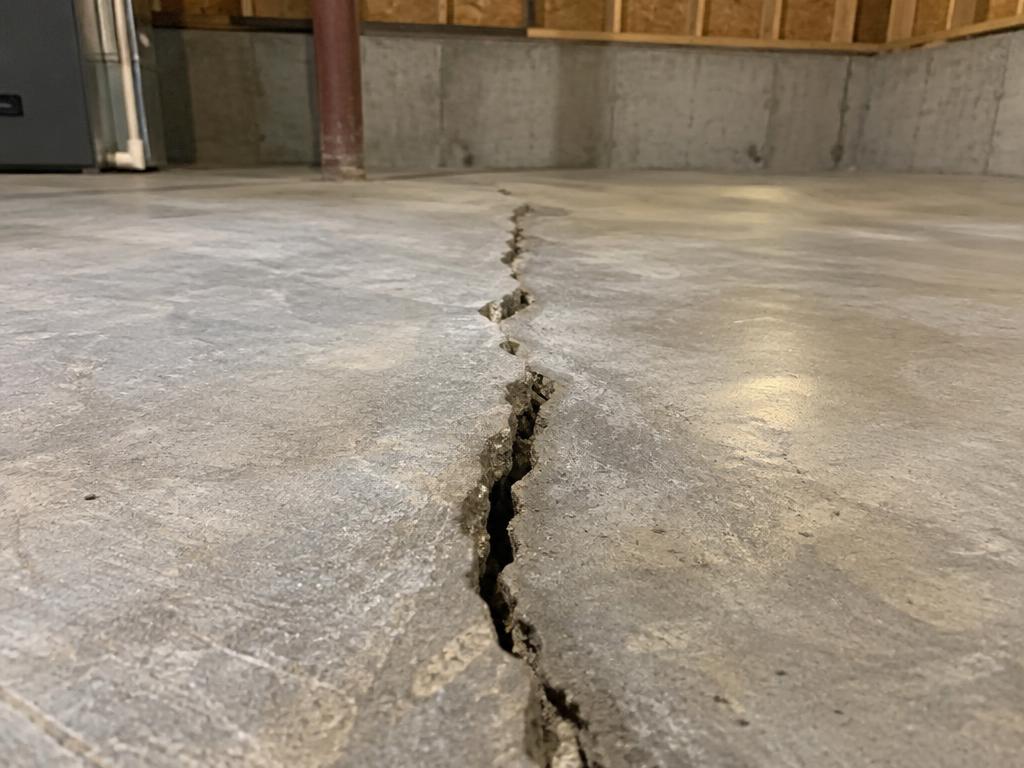
Look for cracking, crumbling, spalling, hollow or loose patches, settlement and vertical displacement.
A concrete slab may appear generally intact while containing localized areas that have moved or deteriorated.
Plywood and OSB Subfloors
Walk the entire room and listen for squeaks or movement.
Check for:
- Loose panels
- Water-damaged or swollen edges
- Soft spots
- Delamination
- Unsupported joints
- Protruding fasteners
- Excessive deflection
Loose panels may require additional fastening into the framing. Damaged panels may require replacement.
A floor that flexes excessively cannot necessarily be corrected by adding patching compound or another layer of underlayment.
Structural Movement Versus Surface Imperfections
A low spot caused by an uneven but stable surface is different from a low spot caused by a moving foundation or deteriorated framing.
Surface preparation products can correct certain surface conditions. They do not necessarily correct the underlying cause of movement.
3. Measure Floor Flatness — Not Just Levelness
One of the most common misunderstandings about flooring preparation is the difference between *flat* and *level*.
A floor can slope gradually from one side of a room to the other and still be flat enough for certain flooring products.
Conversely, a floor can be approximately level overall but contain localized humps and depressions that make it unsuitable for installation.
Most flooring manufacturers specify flatness tolerances rather than requiring a perfectly level floor.
How to Check Flatness
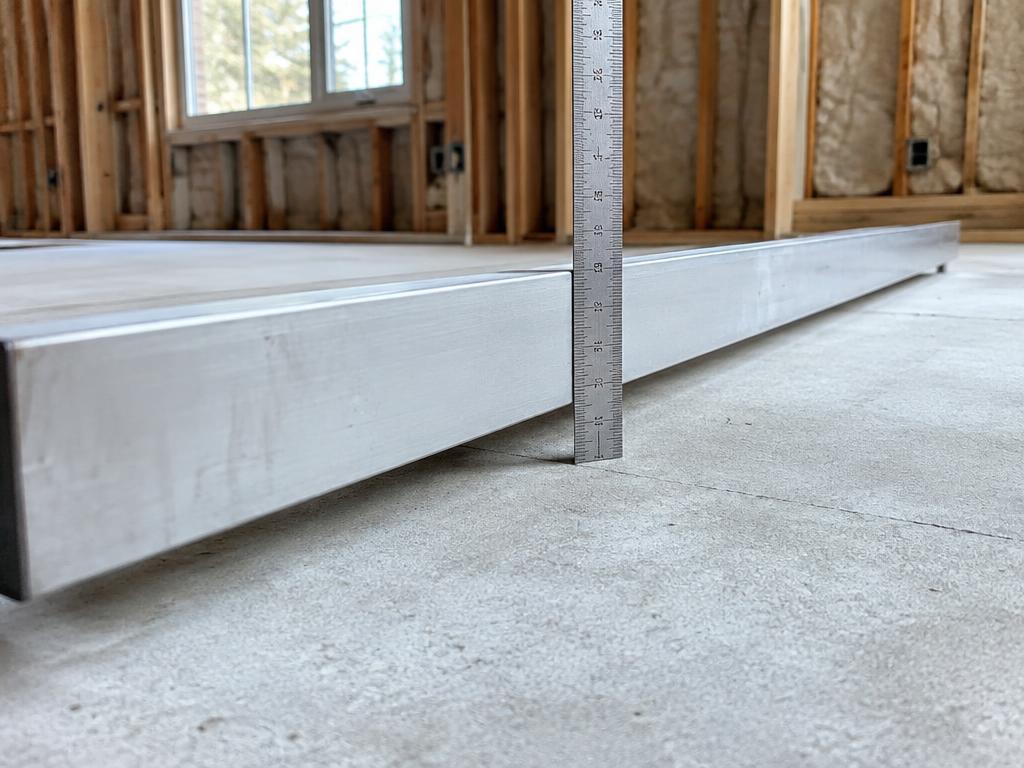
Use a long, rigid straightedge, commonly 6 to 10 feet long, depending on the flooring manufacturer's measurement requirements.
Place it on the floor in several directions.
Check for gaps beneath the straightedge and areas where the straightedge rocks over high spots.
Measure the gaps using a ruler, feeler gauge or another suitable measuring tool.
Mark problem areas directly on the floor.
Repeat the process throughout the room, especially near doorways, transitions, seams and previously repaired areas.
How Flat Is Flat Enough?
There is no single tolerance that applies to every flooring product.
Some click-lock flooring instructions specify maximum variations over a 6-foot or 10-foot distance. Glue-down products may require additional surface smoothness beyond the stated flatness tolerance.
Always use the exact requirements for the flooring being installed.
A floor that meets one manufacturer's requirements may fail another's.
Using a Laser Level
A laser level can help map changes in elevation across a room.
However, a laser does not replace a straightedge for identifying localized humps and depressions.
Both tools can be useful, but they answer different questions.
4. Plan for Height Differences Between Rooms and Flooring Surfaces
Preparing a floor isn't only about making its surface flat. The finished floor also has to meet adjoining flooring at an acceptable height.
A common situation is replacing carpet with LVP or laminate in a room that connects to tile, hardwood or another hard-surface floor.
Carpet and padding may have concealed differences in the underlying floor elevations. Once the carpet is removed, those differences become more apparent.
The thickness of the new flooring, its attached pad or underlayment, and any preparation materials all affect the finished height.
Measure Finished Floor Heights Before Starting
Measure the elevation of the existing substrate and calculate the expected height of the completed flooring system.
Include the thickness of the flooring, required underlayment, adhesive where applicable, and any leveling or patching materials.
Compare that total with adjoining floors at every doorway and transition.
A subfloor that is sufficiently flat may still need preparation to produce a suitable finished-floor transition.
Common Height Problems
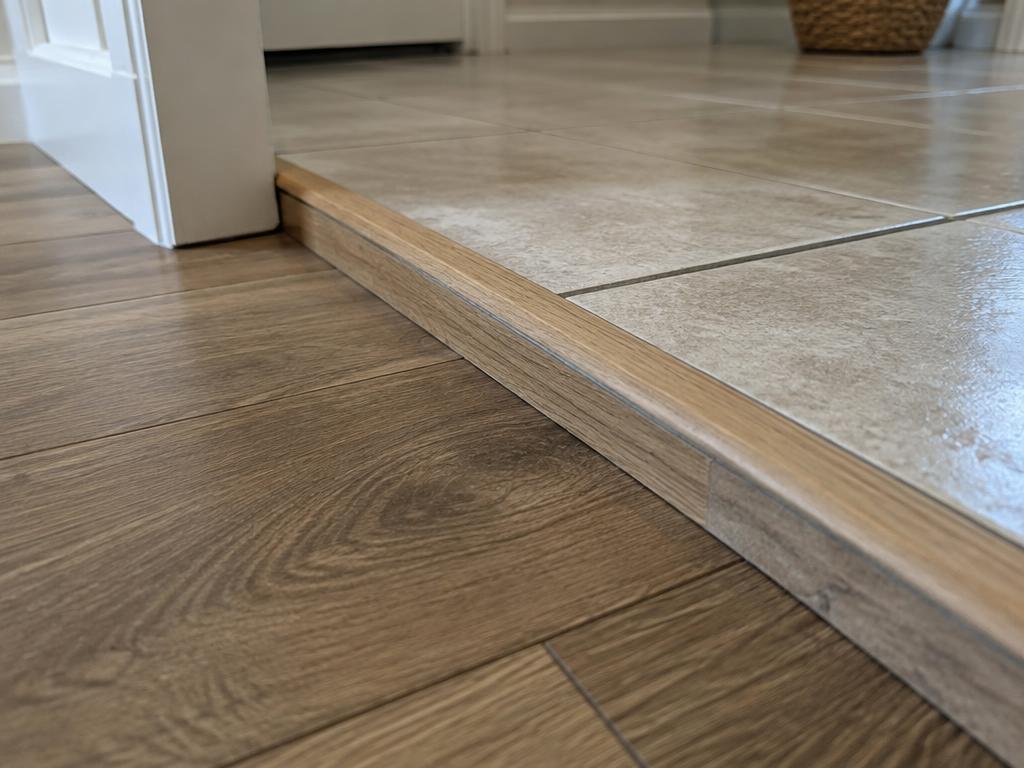
LVP meeting tile: Tile installations may be substantially thicker than LVP. The resulting height difference may require an appropriate reducer or other transition treatment.
Laminate meeting hardwood: Even when both surfaces look similar, their finished heights may differ because of plank thickness and underlayment.
Carpet meeting LVP or laminate: Carpet and padding compress underfoot, while hard-surface flooring does not. A suitable transition must account for the materials' different behavior.
Uneven concrete between rooms: Adjacent slabs or sections of concrete may sit at different elevations. A threshold may need a transition profile, or the preparation may need to address a larger area.
Multiple layers of old flooring: Removing one material while leaving another in place can create unexpected elevation differences.
Ways to Address Height Differences
Depending on the situation, options may include:
- Using a manufacturer-approved reducer transition
- Installing a suitable threshold or transition profile
- Feathering an approved patching compound over an appropriate distance
- Raising a lower substrate using an approved underlayment or preparation system
- Removing existing layers where appropriate
- Selecting flooring with a thickness better suited to adjoining surfaces
These solutions are not interchangeable.
A transition strip can accommodate certain height differences, but it doesn't necessarily correct a poorly prepared floor.
Similarly, raising an entire room to eliminate a small doorway difference may introduce new complications at other doors, cabinets or stairs.
Doors, Appliances and Stairs
Finished floor height can affect more than appearance.
Increasing floor height may reduce door clearance, interfere with appliance removal or create problems at exterior thresholds.
At stairs, changes in finished flooring thickness can alter the height of the first or last riser. Uneven riser heights can create a trip hazard and may violate applicable building requirements.
Transitions also need to be evaluated for safe walking, accessibility and applicable code requirements.
Plan the Transition Before Preparing the Floor
It's much easier to address elevation differences before applying leveling materials or installing new flooring.
The appropriate preparation method should account for the entire finished flooring system, including its connections to adjoining rooms.
5. Test for Moisture Before Preparing the Surface
A subfloor can look completely dry and still contain enough moisture to create flooring problems.
Moisture testing is particularly important over concrete, but wood subfloors also require attention.
Moisture in Concrete
Concrete contains pores through which moisture can move.
Moisture conditions depend on factors such as slab construction, ground moisture, vapor protection, age and the surrounding environment.
A dry-looking surface doesn't establish that a slab meets a flooring manufacturer's moisture requirements.
Concrete Moisture Tests
Depending on the flooring and adhesive system, testing may include:
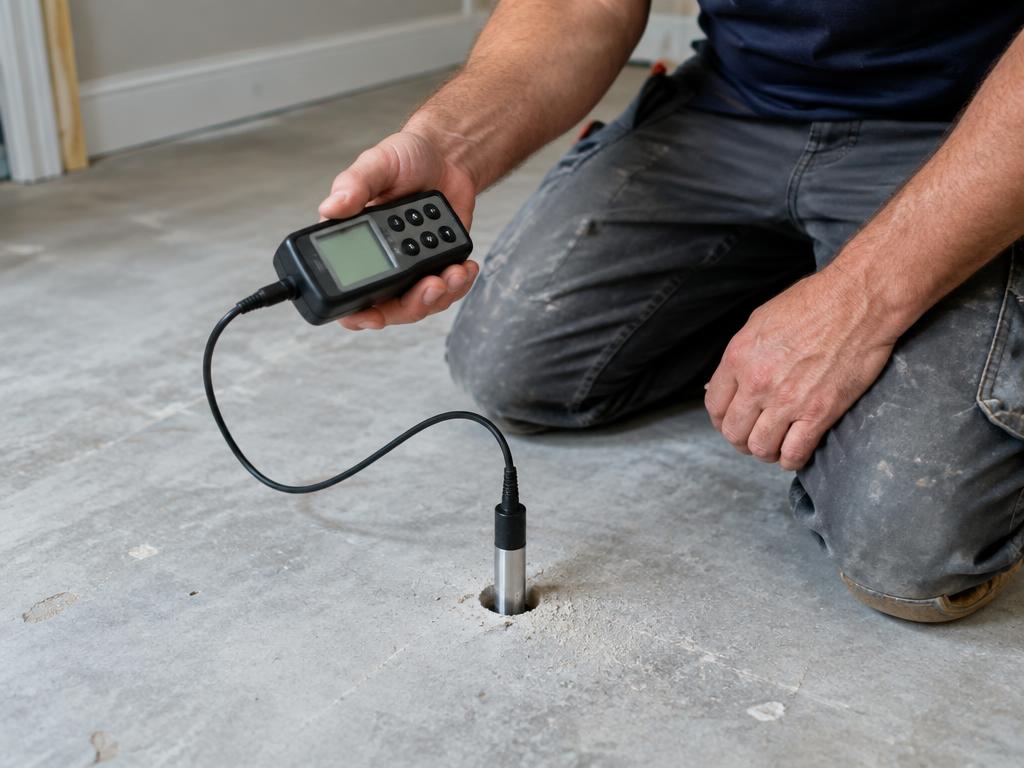
In-situ relative humidity testing: ASTM F2170 measures relative humidity within concrete using probes installed at specified depths.
Calcium chloride testing: ASTM F1869 measures moisture vapor emission from the concrete surface under prescribed conditions. Its applicability and acceptance depend on the specified flooring system.
Electronic moisture meters: These can help identify differences or suspicious areas, but many provide comparative readings rather than a definitive measurement of the concrete's internal moisture condition.
A plastic-sheet test may reveal obvious moisture accumulation, but it is not a substitute for required quantitative testing.
The flooring and adhesive manufacturers determine which test methods and limits apply.
Moisture in Plywood and OSB
Wood-based subfloors can absorb moisture and change dimensions.
A suitable wood moisture meter can help identify excessive moisture or differences between areas.
Check for water damage, swelling and evidence of leaks.
The moisture content must satisfy the requirements of the flooring system being installed.
Moisture Mitigation Is Not the Same as Leveling
A moisture-control coating or system is designed to address a specified moisture condition.
A patching or leveling product is designed primarily to correct surface geometry.
Some products perform multiple functions, but they should never be assumed interchangeable.
A moisture problem must be evaluated separately from a flatness problem.
6. Inspect Concrete Cracks Before Repairing Them
Concrete cracks are common, but they don't all mean the same thing.
Some are relatively stable shrinkage cracks. Others may reflect settlement, soil movement, structural loading or continuing displacement.
The correct repair depends on the crack's cause and behavior.
Hairline and Shrinkage Cracks
Narrow cracks with no vertical displacement may result from concrete shrinkage or other relatively minor movement.
When stable and otherwise suitable, some can be treated using an approved crack-repair system.
However, appearance alone does not prove that a crack is inactive.
Cracks With Vertical Displacement
If one side of a crack is higher than the other, the slab has experienced differential movement.
The cause may involve settlement, heaving or other conditions.
Simply filling the gap does not eliminate the elevation difference or stop future movement.
Recurring or Widening Cracks
A crack that reopens after repair, changes width or accompanies other signs of movement deserves closer investigation.
A patch that repeatedly breaks may be evidence that the underlying condition has not been corrected.
When Cracks Affect Flooring
Cracks and movement can create different problems depending on the flooring.
A floating floor may bridge certain stable imperfections when the installation system permits it, but it still requires adequate support and acceptable flatness.
A glue-down floor is more directly affected by surface movement because the material is bonded to the substrate.
Cracks may telegraph through some flooring systems or cause adhesive and flooring failures.
Crack repair must be compatible with the selected flooring, adhesive and preparation products.
7. Colorado's Expansive Soils: Why Concrete Slabs Move
Colorado's Front Range contains areas with expansive clay-rich soils and bedrock.
These materials can change volume as their moisture content changes.
When certain clay soils absorb water, they swell. When they dry, they shrink.
The resulting movement can exert substantial force on concrete slabs and foundations.
This is one reason some Colorado homes develop cracked, uneven or heaved basement and ground-level concrete floors.
How Expansive Soil Affects Concrete
Imagine a concrete slab resting over soil that doesn't expand uniformly.
One area may receive more moisture from drainage, plumbing leakage, irrigation or changing subsurface conditions.
That soil may swell more than surrounding areas.
The slab can respond by lifting, bending or cracking.
In other situations, drying or consolidation can contribute to downward movement.
The result may be an uneven floor with ridges, depressions or cracks.
Not Every Concrete Crack Is Caused by Expansive Soil
Concrete can crack for many reasons, including shrinkage, settlement, loading, construction details and temperature-related movement.
The presence of a crack alone does not establish expansive soil as its cause.
Likewise, a floor that slopes or contains a low spot is not necessarily experiencing ongoing movement.
Understanding the likely cause matters before selecting a repair.
Colorado Basement Slabs
Some Colorado homes have basement slabs designed to accommodate a degree of soil movement independently of the primary structural foundation.
These are sometimes called floating slabs.
The term does not mean that the slab is immune to movement or that it can be treated as a perfectly stable flooring substrate.
Slab construction varies, and not every basement uses the same system.
Why Surface Leveling May Not Solve the Problem
Suppose a concrete slab has developed a raised area because the soil beneath it expanded.
Grinding down the raised area may improve the immediate surface geometry.
Applying leveling compound around it may also create a temporarily flatter surface.
But neither method stops the soil from moving.
If the slab continues to heave or settle, the corrected surface may crack, separate or become uneven again.
A crack may be the visible symptom. The actual problem may be beneath the concrete.
Signs That Deserve Additional Investigation
Pay attention to combinations of symptoms such as:
- Cracks with vertical displacement
- Repeated cracking after previous repairs
- Noticeable slab heaving
- Rapidly changing floor elevations
- Movement at walls, columns or fixed structures
- Doors becoming difficult to operate
- Evidence of water intrusion or drainage problems
These symptoms don't prove a particular diagnosis. They indicate that a surface repair alone may not address the underlying condition.
Where active movement or structural distress is suspected, determining the cause is a separate step from choosing flooring preparation materials.
8. Identify High Spots, Low Spots and Surface Contamination
Once the substrate has been evaluated for structural condition and moisture, map the areas requiring surface correction.
High Spots
High spots may include concrete ridges, uneven patches, raised panel seams or localized humps.
Possible correction methods include grinding, sanding or other approved surface-removal techniques.
The appropriate method depends on the material.
Low Spots
Low spots may be corrected using suitable patching or leveling products.
The product must be approved for the substrate, application thickness, flooring system and environmental conditions.
Some compounds are designed for small localized repairs. Others are designed to flow across larger areas.
Surface Contamination
Adhesive residue, paint, oil, curing compounds, sealers, wax and other contaminants can interfere with bonding.
This is particularly important for glue-down flooring, primers, patching compounds and moisture-control systems.
The surface must meet the preparation requirements of the products being applied.
Existing Patches
Old patching materials may be loose, cracked, incompatible or inadequately bonded.
Adding another layer over a failing patch doesn't restore the strength of the material underneath.
Evaluate existing repairs before building over them.
9. Choose the Correct Preparation Method — and Equipment
Subfloor preparation can involve anything from a few hand tools to large, specialized machines.
The equipment needed depends on the substrate, room size, existing flooring, amount of material to remove and type of correction required.
Measuring and Inspection Equipment
Common tools include:
- Long rigid straightedges
- Measuring tapes and rulers
- Feeler gauges
- Laser levels
- Moisture meters
- Concrete relative-humidity testing equipment
- Crack-width gauges or monitoring devices
- Marking tools
Some equipment is inexpensive and useful for ordinary home maintenance.
Other instruments, particularly certain concrete moisture-testing systems, require specialized supplies, procedures and interpretation.
Concrete Grinding Equipment
Grinding removes high spots, old coatings and certain surface contaminants.
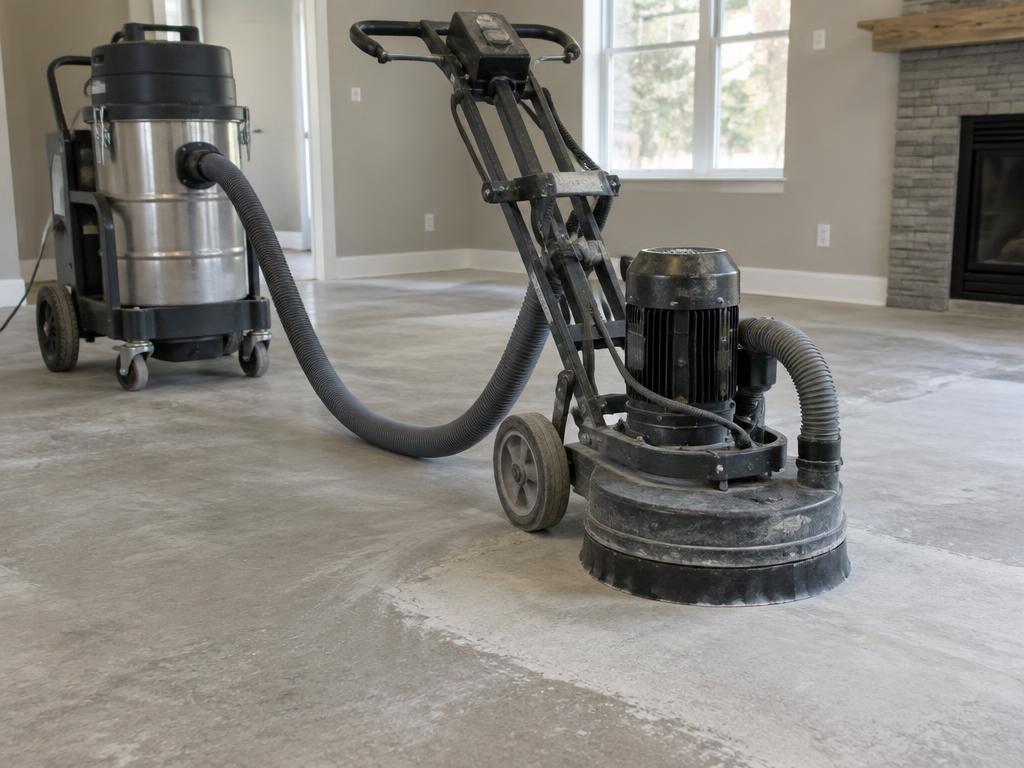
Handheld concrete grinders with appropriate diamond cup wheels can be useful for localized areas and edges.
Walk-behind concrete grinders are used for larger areas and more extensive surface correction.
Equipment selection depends on the required removal depth, concrete hardness, room size and available power.
Grinding concrete can generate hazardous respirable crystalline silica dust.
Appropriate engineering controls, dust extraction, respiratory protection and work practices are essential. A household vacuum is not an adequate substitute for suitable dust-control equipment.
Concrete grinders and compatible dust extractors are commonly available through equipment rental companies.
Floor Scrapers and Removal Machines
Old flooring and adhesive residue may require:
- Hand scrapers
- Long-handled floor scrapers
- Powered floor scrapers
- Walk-behind removal machines
Powered equipment can be useful for large areas of bonded flooring.
Before mechanically disturbing older materials, determine whether hazardous substances such as asbestos may be present.
Scarifiers and Shot Blasters
Some concrete preparation systems require more aggressive mechanical treatment.
Scarifiers use rotating cutting assemblies to remove or texture concrete surfaces.
Shot blasters propel abrasive media against concrete and recover the material through an integrated system.
These machines may be used to remove coatings, prepare concrete for certain bonded systems or create a specified surface profile.
They are not interchangeable with ordinary floor grinders.
Their use depends on the preparation product's requirements and the condition of the slab.
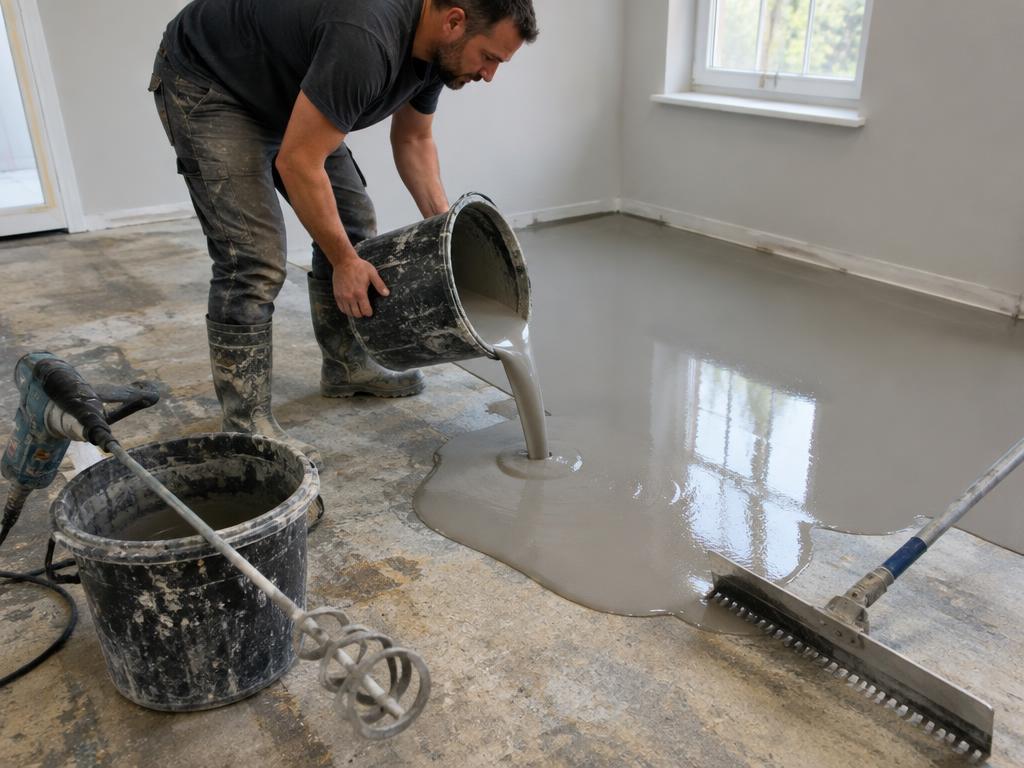
Mixing and Applying Patching Compounds
Depending on the product, tools may include:
- Heavy-duty mixing drills
- Manufacturer-specified mixing paddles
- Measuring containers
- Clean mixing buckets
- Trowels
- Smoothing tools
- Gauge rakes
- Spiked rollers
- Appropriate footwear and protective equipment
Some self-leveling products have short working times.
Water quantities, mixing duration, temperature, primer selection and application thickness can affect performance.
Adding extra water to improve flow can weaken a product or interfere with curing.
Wood-Subfloor Equipment
Plywood and OSB preparation may require:
- Screw guns and approved fasteners
- Circular saws
- Oscillating multitools
- Sanders
- Straightedges
- Replacement panels
- Appropriate wood-subfloor patching materials
Raised panel edges may require correction, but excessive sanding can damage the structural panel.
Loose or damaged panels may need fastening or replacement rather than surface smoothing.
Equipment Rental Considerations
Before renting equipment, determine:
- The exact task the machine must perform
- Whether it is suitable for the substrate
- Available electrical power
- Machine weight and transportation requirements
- Dust extraction requirements
- Consumables such as diamond tooling
- Expected production rate
- Required surface finish
- Cleanup and disposal requirements
A machine capable of removing concrete quickly may also remove too much material if used incorrectly.
Grinding, Patching and Self-Leveling Are Different Operations
These methods solve different problems.
Grinding removes material from high areas.
Patching fills localized depressions or repairs suitable surface defects.
Self-leveling underlayment is a flowable material designed to create a smoother, flatter surface under specified conditions.
A self-leveling product doesn't necessarily correct an actively moving slab, and a grinder cannot solve a moisture problem.
The right sequence may involve more than one method.
10. Prepare the Surface for the Flooring Being Installed
Different flooring materials place different demands on the prepared surface. Whatever you choose, our team installs carpet & flooring throughout Colorado.
A subfloor suitable for carpet may not be acceptable for glue-down LVP.
Likewise, a floor that appears smooth may still be too uneven for a click-lock system.
Click-Lock LVP
Click-lock luxury vinyl plank is commonly installed as a floating floor.
Its locking joints need adequate, consistent support.
High spots and depressions can allow the planks to flex or move in ways the locking system wasn't designed to accommodate.
Possible consequences include joint separation, clicking sounds, damaged locking edges and uneven wear. For a closer look at what goes wrong with floating floors, see why LVP floors peak and separate.
Verify:
- Manufacturer flatness tolerance
- Substrate condition
- Moisture requirements
- Expansion clearances
- Approved underlayment
- Compatibility with existing flooring, if applicable
An attached pad does not automatically compensate for an uneven subfloor.
Glue-Down LVP
Glue-down luxury vinyl plank is bonded directly to the prepared substrate.
This makes surface preparation particularly important.
Because many glue-down vinyl products are relatively thin, small imperfections beneath them may become visible through the finished surface.
This is called telegraphing. If you are weighing installation methods, our guide to click-lock vs. glue-down LVP walks through the differences.
Examples include:
- Trowel marks
- Uneven patch edges
- Concrete ridges
- Panel seams
- Adhesive residue
- Surface debris
- Poorly finished repairs
Glue-down LVP generally requires a smooth, clean, sound and properly prepared substrate.
But smoothness is only one requirement.
The adhesive must also be compatible with the substrate's moisture condition, porosity, surface preparation and any existing coatings or mitigation systems.
Porous and Nonporous Surfaces
Some flooring adhesives behave differently on porous and nonporous substrates.
A porous surface can absorb some adhesive moisture, while a nonporous surface may require a different application method, adhesive or drying time.
Adhesive manufacturers may specify different trowel notches, spread rates, open times or installation procedures.
A surface that looks clean and smooth may still be unsuitable for the adhesive being used.
Why Glue-Down LVP Can Require More Preparation
Floating flooring is not bonded across its entire underside.
Glue-down flooring depends on the bond between the substrate, adhesive and flooring.
Surface contamination, inadequate preparation, excess moisture or incompatible materials can compromise that bond.
The preparation standard may therefore be more demanding, particularly regarding smoothness and surface condition.
Laminate Flooring
Click-lock laminate also requires a sufficiently flat and stable substrate. If you are still deciding between the two, our LVP vs. laminate flooring guide compares them in detail.
Because laminate generally contains a wood-fiber core, moisture and environmental conditions are particularly important.
Check:
- Flatness requirements
- Approved underlayment
- Moisture protection requirements
- Expansion clearances
- Indoor temperature and humidity limits
- Manufacturer-approved substrates
An acoustic underlayment does not replace required flattening or structural repairs.
Carpet: A Forgiving Option for Imperfect Subfloors
Carpet is considerably more forgiving of subfloor irregularities than click-lock LVP, laminate or glue-down vinyl.
In many homes, carpet and padding can cover minor depressions, uneven concrete, plywood seams and other imperfections without extensive surface preparation.
This is one reason carpet is frequently used in rooms where installing hard-surface flooring would require substantial grinding, patching or leveling.
Unlike rigid flooring, carpet does not have locking joints that require continuous support. And unlike glue-down LVP, ordinary stretch-in carpet is not bonded directly to every square inch of the substrate.
Carpet can also help conceal minor variations in floor height and surface texture.
That doesn't mean every subfloor condition can be ignored. Sharp protrusions, exposed fasteners, significant movement, moisture problems and deteriorated substrates still require attention.
But carpet generally requires far less subfloor correction than hard-surface flooring, particularly when installed over appropriate padding. If you are outfitting a rental, see our rental-grade carpet guide.
For a homeowner comparing flooring options, the condition of the existing subfloor can be an important factor in the total installed cost and how carpet is measured and priced by the square yard.
Hardwood Flooring
Although hardwood installation has its own specialized requirements, subfloor condition remains important.
Wood flooring systems may have specific limits for flatness, moisture, panel thickness, structural support and fastening.
Wood flooring can also respond to seasonal humidity changes, making environmental conditions especially relevant in Colorado.
11. Verify the Finished Subfloor Before Installing Flooring
After completing repairs, repeat the inspection rather than assuming the work is finished.
Check Flatness Again
Use the same measurement method required by the flooring manufacturer.
Check previously marked high and low areas and verify the entire installation surface.
Inspect Patches and Leveling Materials
Confirm that repairs are:
- Properly bonded
- Fully cured or ready for covering according to instructions
- Free of cracks and loose material
- Smooth enough for the selected flooring
- Compatible with subsequent adhesives or underlayment
Dry-to-the-touch does not necessarily mean ready for flooring installation.
Confirm Moisture Conditions
Moisture requirements still apply after grinding, patching or leveling.
Some preparation materials introduce additional moisture during application.
Follow the required curing, drying and testing procedures.
Recheck Finished Floor Heights
Verify that the prepared surface will produce acceptable transitions to adjoining flooring.
Confirm doorway clearances, appliance access, thresholds and stair riser consistency.
Clean the Surface
Remove dust, loose particles, debris and contaminants using methods appropriate to the substrate and flooring system.
For bonded products, cleaning and surface condition are especially important.
Confirm Environmental Conditions
Verify that room temperature, substrate temperature and indoor humidity satisfy the flooring manufacturer's requirements.
This can be particularly important in Colorado during dry winter conditions or periods of large temperature changes.
12. Common Subfloor Preparation Mistakes
Mistake 1: Confusing Flatness With Levelness
A floor doesn't always need to be perfectly level. It does need to satisfy the flooring manufacturer's flatness requirements.
Mistake 2: Forgetting About Finished Floor Heights
A room may be flat but still require preparation or transitions where it meets adjoining flooring.
Mistake 3: Assuming a Crack Is Harmless
Some cracks are relatively stable. Others indicate movement.
The appearance of a crack alone may not establish its cause.
Mistake 4: Pouring Leveler Over a Moving Slab
A surface correction doesn't necessarily stop movement beneath the concrete.
Mistake 5: Using Extra Underlayment to Hide Unevenness
Thicker padding can create excessive movement under click-lock flooring and damage the joints.
Mistake 6: Skipping Moisture Testing
A dry-looking slab may still exceed the moisture limits of the selected flooring or adhesive.
Mistake 7: Ignoring Old Adhesive or Contamination
Residue and coatings can interfere with patching, primers, adhesives and moisture-control products.
Mistake 8: Using the Wrong Preparation Compound
Not every patch or leveling material is approved for every substrate, thickness or flooring system.
Mistake 9: Assuming All Flooring Requires the Same Surface
Glue-down LVP, floating LVP, laminate and carpet have different preparation requirements.
Mistake 10: Overlooking Dust and Material Hazards
Concrete grinding can produce respirable silica dust. Disturbing some older flooring materials may release asbestos or lead-containing dust.
Hazard identification and appropriate controls are part of preparation.
Mistake 11: Failing to Recheck the Surface
Preparation is complete only when the finished substrate meets the selected flooring system's requirements.
13. A Practical Subfloor Preparation Checklist
Before installing new flooring, work through these questions:
- ☐ Have I identified the actual subfloor material and any existing layers?
- ☐ Have I checked for hazardous older materials before disturbing them?
- ☐ Is the substrate structurally sound and adequately supported?
- ☐ Have I inspected cracks, movement and damaged areas?
- ☐ Have I measured flatness using the required method?
- ☐ Have I identified high spots and low spots?
- ☐ Have I calculated finished-floor heights at adjoining rooms?
- ☐ Have I planned appropriate transitions?
- ☐ Have I checked door, appliance, threshold and stair clearances?
- ☐ Have I evaluated moisture using the appropriate test method?
- ☐ Do I understand the likely cause of any significant concrete cracking or movement?
- ☐ Have I selected preparation products approved for the substrate?
- ☐ Do I have the necessary equipment and dust-control measures?
- ☐ Are all repairs properly cured and bonded?
- ☐ Does the surface meet the flooring manufacturer's smoothness and flatness requirements?
- ☐ Are the substrate and environmental conditions acceptable?
- ☐ Have I cleaned and inspected the entire installation area again?
A floor that passes these checks is much closer to being ready for installation.
A floor with unresolved moisture, movement, structural damage or incompatible materials may require additional investigation before the correct preparation method can be determined.
Frequently Asked Questions
Does a subfloor have to be perfectly level for LVP?
Not necessarily. Most manufacturers specify flatness tolerances rather than requiring a perfectly level surface. Follow the requirements for the specific flooring product. You can browse our luxury vinyl plank options or carpet styles to see what is available.
Can I use self-leveling compound over cracked concrete?
Possibly, depending on the crack's condition, the substrate and the leveling product. A leveling compound does not stop ongoing slab movement, and cracks may require separate treatment.
Can expansive soil cause basement floor cracks in Colorado?
Yes. Certain clay-rich soils expand when wet and shrink as they dry. This movement can contribute to cracking, heaving or settlement. However, not every basement crack is caused by expansive soil.
Can I grind down a high spot in concrete?
Concrete grinding is a common method of correcting certain high spots. The appropriate equipment, removal depth, dust controls and suitability of the slab must be considered.
What equipment can I rent to prepare concrete for new flooring?
Depending on the job, rental equipment may include handheld or walk-behind concrete grinders, powered floor scrapers, dust extractors, scarifiers, shot blasters and heavy-duty mixing equipment.
How do I test concrete for moisture before installing flooring?
Common methods include in-situ relative-humidity testing and, where applicable, calcium chloride testing. The flooring and adhesive manufacturers specify acceptable methods and moisture limits.
Is subfloor preparation different for glue-down LVP?
Yes. Glue-down LVP generally requires a particularly smooth, clean and compatible surface because the flooring bonds directly to the substrate. Small imperfections can telegraph through the finished material.
Can carpet cover an uneven subfloor?
Carpet and padding can conceal many minor imperfections that would require correction for hard-surface flooring. However, significant movement, moisture problems, sharp protrusions and damaged substrates still require attention.
What if my new flooring is lower than the tile in the next room?
An appropriate reducer or transition profile may accommodate the difference. Other situations may require modifying the prepared floor height. The solution depends on the materials, height difference and safety requirements.
Can an attached pad compensate for an uneven subfloor?
No. Attached pads and acoustic underlayments do not eliminate the need to meet the manufacturer's flatness requirements.
How can I tell whether a concrete crack is still moving?
Changes in width, recurring cracking, vertical displacement and other movement-related symptoms may provide clues. A single visual inspection cannot always determine whether a crack is active or establish its cause.
Can flooring be installed over old adhesive?
Sometimes, but only when the existing adhesive residue, substrate and new installation system are compatible. Some residues require removal or specific preparation. Older materials should be evaluated for potential hazards before disturbance.
How long does floor leveling compound take to dry?
It depends on the specific product, application thickness, temperature, humidity and substrate conditions. Follow the manufacturer's instructions for when the material can be covered with flooring.
Is a smooth subfloor the same as a flat subfloor?
No. A surface can be smooth but uneven, or flat overall while having rough areas. Glue-down flooring in particular may require both appropriate flatness and a very smooth surface.
The Bottom Line
Subfloor preparation is a series of decisions, not a single task.
A clean, stable, dry and sufficiently flat surface may need very little correction before new flooring is installed.
Other floors require more investigation.
A low spot might call for patching. A high spot might require grinding. A damaged wood panel might need replacement. A moisture problem may require a specific mitigation system. A cracked Colorado basement slab may require understanding what caused the movement before deciding how to prepare its surface.
The finished height of the new floor also matters. Even a flat surface may require additional planning where it meets tile, hardwood, carpet, stairs or adjoining rooms.
And sometimes the condition of the subfloor helps determine which flooring makes the most sense. Carpet can conceal minor imperfections that would require extensive preparation for rigid or glue-down flooring.
Each condition calls for a different approach.
The most important step is identifying what the subfloor actually needs—and verifying that the finished surface meets the requirements of the flooring being installed.
Questions about preparing your subfloor? Call for a Free Estimate.